

User Guide
Optimizing Kubernetes with Workload Rightsizing and Autopilot
Overview
Kubernetes has a concept called "resource requests" and "resource limits". The k8s page has the following description on resource requests and limits:
When you specify a Pod, you can optionally specify how much of each resource a container needs. The most common resources to specify are CPU and memory (RAM); there are others.
When you specify the resource request for containers in a Pod, the kube-scheduler uses this information to decide which node to place the Pod on. When you specify a resource limit for a container, the kubelet enforces those limits so that the running container is not allowed to use more of that resource than the limit you set. The kubelet also reserves at least the request amount of that system resource specifically for that container to use
Configuring resource requests and limits optimally and continuously is a challenging task. Imagine that:
- You have hundreds of workloads that have different performance characteristics.
- Performance characteristics of your workloads change over time.
- Performance characteristics of your workloads vary among different clusters (e.g., dev/staging/prod).
It will be difficult for DevOp persons to manually look at a performance dashboard and configure every single workload optimally. When resource requests/limits are not optimally configured, it decreases resource utilization or damages service SLO (e.g., out-of-memory, CPU contention).
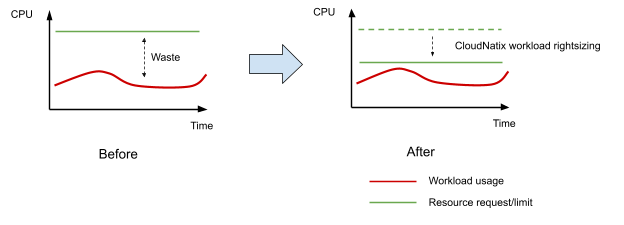
CloudNatix workload rightsizing solves the above problem by continuously optimizing resource requests and limits based on past historical usage of workloads. The following diagram illustrates the basic idea of workload rightsizing.
CloudNatix internally uses a forked version of Vertical Pod Autoscaler (VPA). While VPA is a popular open source project, it has not been widely used due to its complexity and/or lack of usability. Values that CloudNatix brings include:
- Dashboard that provides a glance view of past historical usage and recommended resource requests
- Instant application of right-sizing from GUI (including "manual" mode for tweaking recommendation)
- Automatic right-sizing recommendation generation for every workload in any environment
- Recommendation aggregation across multiple clusters
- Enhanced recommendation algorithm and parameter optimization to avoid crash-looping at application start-up times.
- Right-sizing mode management via k8s annotations (= VPA "Operator")
The following is an example k8s annotation that a user can set to a deployment to enable Autopilot on workload rightsizing.
apiVersion: apps/v1
kind: Deployment
metadata:
  annotations:
    recommendation.cloudnatix.com/mode: auto
This allows users to follow the Infrastructure-as-code principle.
Once workloads are right-sized, the amount of available resources in the cluster increases. The total spend will also decrease if Cluster Autoscaler can reduce the number of nodes needed well as clusters have a smaller resource footprint.
Note: Please note that the same resource (both CPU and memory) cannot be configured for one workload in both Horizontal Pod Autoscaler (HPA) and VPA. If the same resource is specified, the recommendation for the corresponding resource in the VPA will be disabled. This is because the VPA's recommendation cannot be calculated correctly when HPA and VPA are used together.
View Recommendations
You can view rightsizing recommendations from CloudNatix GUI console (https://app.cloudnatix.com) or with CloudNatix CLI.
Viewing from CloudNatix GUI Console
To view recommendations from https://app.cloudnatix.com, take the following steps:
- Visit the Workload page.
- Find a target workload. You can search the workloads with table filter.
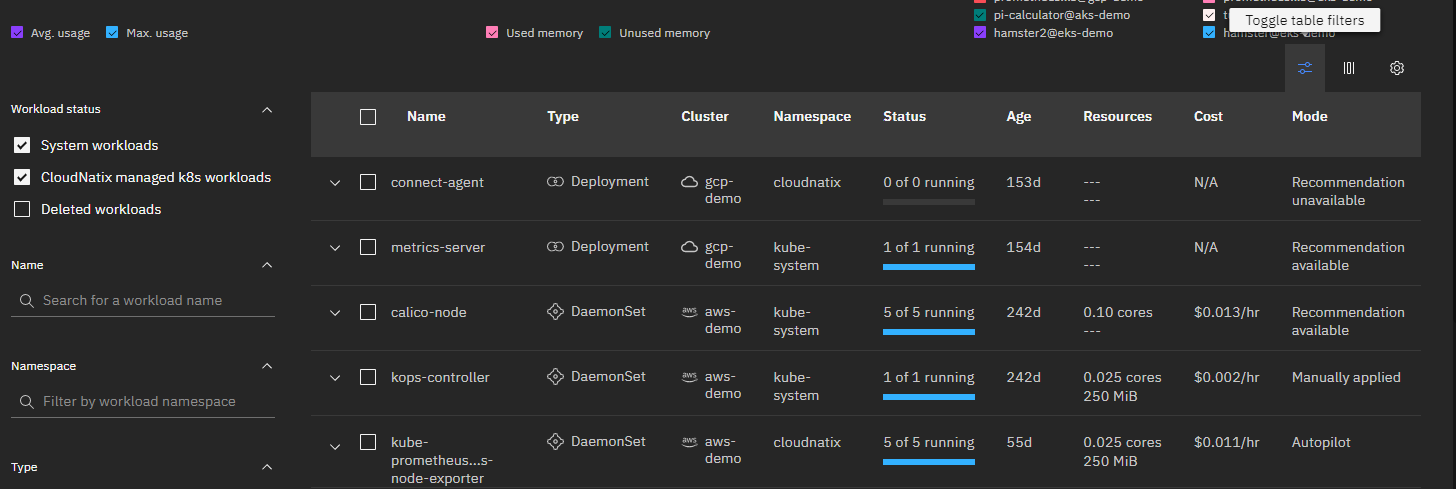
- Select the workload and click the "Recommendations" tab.
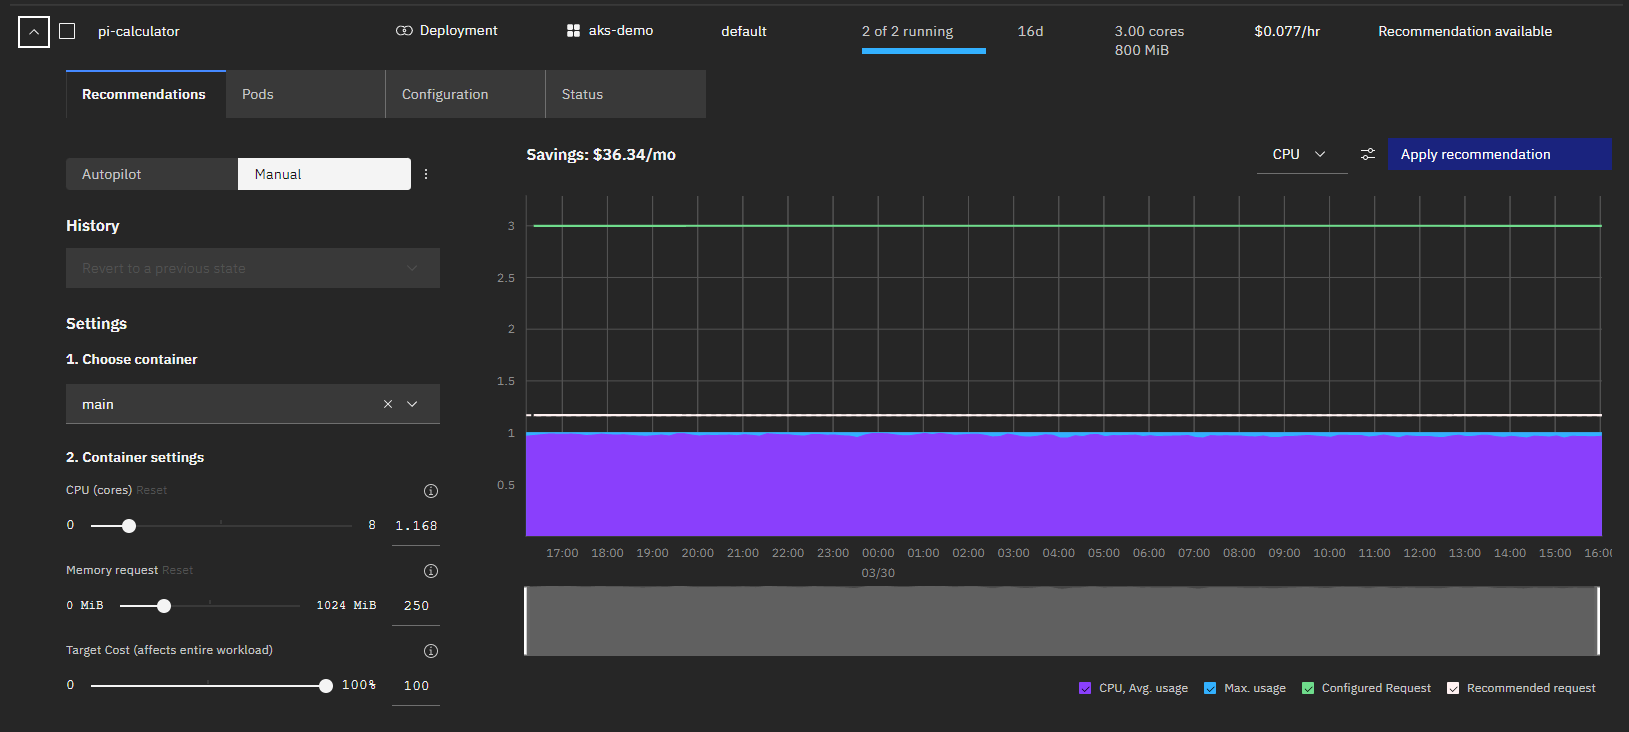
The graph shows historical usage (average and max), configured resource requests, and recommended resource requests.
Viewing with CloudNatix CLI
To view recommendations with CLI, type the following command:
cnatix recommendations workloads summary --cluster-name ${CLUSTER_NAME}
You can pass --kind, --namespace, and --name to filter out the output.
Apply the Recommendation
CloudNatix provides three ways to apply recommendations and enable Autopilot:
- From CloudNatix GUI console
- With CloudNatix CLI
- With Kubernetes annotations
CloudNatix GUI and CLI provide two recommendation application mode: "Autopilot" and "Manual". The "Autopilot" mode applies recommendations continuously and dynamically while the "Manual" mode is an one-time application. With the "Manual" mode, you can tweak and make modification.
Applying from CloudNatix GUI Console
You can select either the "Autopilot" mode or the "Manual" mode from the tab.
When you select the "Autopilot" mode, you can simply click "Enable autopilot". Recommendations are continuously applied to the workload.
When you select the "Manual" mode, you can use the "Setting" panel to make modification to the generated recommendations.

Then you can click "Apply recommendation" to apply the adjusted recommendation. you can choose whether Autopilot is applied to all resources (both CPU and memory) or only to a selected resource. Normally Autopilot can be applied to both CPU and memory. If a workload uses Horizontal Pod Autoscaler (HPA) based on target CPU utilization, a user can enable Autopilot only on memory.
Applying with CloudNatix CLI
Type cnatix recommendations workloads apply to enable the Autopilot mode.
cnatix recommendations workloads apply \
  --cluster-name ${CLUSTER_NAME} \
  --kind ${KIND} \
  --namespace ${NAMESPACE} \
  --name ${NAME} \
When enabling the "Manual" mode, specify --container, --cpu, and --memory.
cnatix recommendations workloads apply \
  --cluster-name ${CLUSTER_NAME} \
  --kind ${KIND} \
  --namespace ${NAMESPACE} \
  --name ${NAME} \
  --container ${CONTAINER} \
  --cpu ${CPU} \
  --memory ${MEMORY}
You can run the summary command to verify that the mode is changed:
cnatix recommendations workloads summary \
  --cluster-name ${CLUSTER_NAME} \
  --kind ${KIND} \
  --namespace ${NAMESPACE} \
  --name ${NAME}
If you want to enable Autopilot on either CPU or memory only, you can specify the target resource with --autopilot-managed-resource.
cnatix recommendations workloads apply \
  --cluster-name ${CLUSTER_NAME} \
  --kind ${KIND} \
  --namespace ${NAMESPACE} \
  --name ${NAME} \
  --autopilot-managed-resource ${one of 'cpu', 'memory', 'all'}
Applying with Kubernetes Annotations
In addition to its own GUI/CLI, CloudNatix allows users to enable Autopilot via k8s annotations, which works best when users want to configure the recommendation mode from their CI/CD pipeline.
The following is an example Deployment YAML file where Autopilot is enabled.
apiVersion: apps/v1
kind: Deployment
metadata:
  name: my-nginx
  labels:
    app: nginx
  annotations:
    recommendation.cloudnatix.com/mode: auto
spec:
  replicas: 1
  selector:
    matchLabels:
      app: nginx
  template:
    metadata:
      labels:
        app: nginx
    spec:
      containers:
        - name: nginx
          image: nginx:1.14.2
          ports:
            - containerPort: 80
The recommendation.cloudnatix.com/mode: auto annotation works to enable Autopilot.
Please note that annotations are NOT specified in a pod template, but specified in the metadata of a target workload (e.g., Deployment).
Here is a list of annotations that can be set to workloads:
| Annotation key | Annotation value | Description |
|---|---|---|
recommendation.cloudnatix.com/mode | auto or off | Enable (or disable) Autopilot mode |
recommendation.cloudnatix.com/resources | cpu or memory | Specify resource where Autopilot is applied |
recommendation.cloudnatix.com/min-allowed-cpu | resource unit (e.g., 100m) | Lower bound of CPU request |
recommendation.cloudnatix.com/min-allowed-memory | resource unit (e.g., 512Mi) | Lower bound of memory request |
<container-name>.recommendation.cloudnatix.com/min-allowed-cpu | resource unit (e.g., 100m) | Lower bound of CPU request per container |
<container-name>.recommendation.cloudnatix.com/min-allowed-memory | resource unit (e.g., 512Mi) | Lower bound of memory request per container |
recommendation.cloudnatix.com/min-available | integer or percentage | Minimum available pods when new recommendation is applied |
recommendation.cloudnatix.com/max-unavailable | integer or percentage | Max unavailable pods when new recommendation is applied |
recommendation.cloudnatix.com/update-window-start | cron expression (e.g., CRON_TZ=America/Los_Angeles 0 6 * * *) | Schedule for enabling VPA to evict and update Pod resources |
recommendation.cloudnatix.com/update-window-end | cron expression (e.g., CRON_TZ=America/Los_Angeles 0 21 * * *) | Schedule for disabling VPA to evict and update Pod resources |
recommendation.cloudnatix.com/controlled-values | requests-and-limits or requests-only | Specify the controlled values that VPA recommendations will affect when it is applied |
The recommendation.cloudnatix.com/mode annotation is mandatory to enable the Autopilot mode. All other annotations are optional.
When recommendation.cloudnatix.com/resources is specified, Autopilot is applied only to the specified resource. This configuration is typically useful when a workload uses Horizontal Pod Autoscaler (HPA) based on target CPU utilization and a user wants to enable Autopilot only on memory.
The recommendation.cloudnatix.com/min-allowed-cpu annotation and the recommendation.cloudnatix.com/min-allowed-memory annotation specify the lower bound of the recommended resource requests. CloudNatix Autopilot won't set the resource request below the specified lower bound. If you want to specify the lower bound to a specific container, specify <container-name>.recommendation.cloudnatix.com/min-allowed-cpu or <container-name>.recommendation.cloudnatix.com/min-allowed-memory.
The recommendation.cloudnatix.com/min-available annotation and the recommendation.cloudnatix.com/max-unavailable annotation specify the pod restart policy when pods are recreated to apply a new recommendation. When these annotations are not specified, the restart policy of the workload is derived from its rollingUpdate.
The recommendation.cloudnatix.com/update-window-start annotation and the recommendation.cloudnatix.com/update-window-end annotation specifies the start and end schedules for allowing VPA to evict and update Pod resources. Within the start and end update window, VPA can freely evict and re-create Pods with the updated resources. Outside the update window, the VPA mode is set to Initial to prevent VPA from evicting and re-creating the Pod resources. Recommendations are still being generated, but they are not applied. The timezone of the schedule can be specified with CRON_TZ=<timezone> prefix. If no timezone is specified, the timezone of underlying K8s nodes is used.
The recommendation.cloudnatix.com/controlled-values annotation specifies the controlled values which VPA recommendations will affect. The possible values are requests-and-limits and requests-only. They modify ResourceRequests and ResourceLimits or only ResourceRequests, respectively. By default, requests-and-limits are used.
Note: We require both
update-window-startandupdate-window-endto be populated with the same frequency. E.g., If theupdate-window-startis set to0 5 * * 1-5, theupdate-window-endneeds to be set to0 21 * * 1-5.
Automatic Tuning to Startup Probe
In addition to automatically adjusting the resource allocation of workloads, CloudNatix automatically configures startup probes. The mechanism prevents applications from running into a crash-loop when Autopilot recommends a smaller amount of resources, which can slow down the application startup.
Kubelet uses a startup probe to know when a container application has started. If such a probe is configured, it disables liveness and readiness checks until it succeeds, making sure those probes don't interfere with the application startup.
If a workload with the Autopilot mode has a liveness probe but does not have a startup probe, CloudNatix automatically sets up a startup probe based on the liveness probe. The parameters of the startup probe are the same as the liveness probe except initialDelaySeconds and failureThreshold. The value of failureThreshold is set to a bigger value than that of the liveness check so that Kubelet waits for a longer time until Kubelet considers that the startup probe fails and decides to restart the container.
Suppose that a deployment has the following spec:
apiVersion: apps/v1
kind: Deployment
metadata:
  name: nginx
spec:
  template:
    spec:
      containers:
      - image: nginx:latest
        livenessProbe:
          exec:
            command: ["/bin/sh", "-c", "echo"]
          failureThreshold: 3
          initialDelaySeconds: 20
          periodSeconds: 5
          successThreshold: 1
          timeoutSeconds: 1
The pod of the deployment will have the startup probe based on its liveness probe.
apiVersion: v1
kind: Pod
metadata:
  name: nginx
  annotations:
    vpaProbeUpdates: startupProbe added
spec:
  containers:
  - image: nginx:latest
    livenessProbe:
      exec:
        command: ["/bin/sh", "-c", "echo"]
      failureThreshold: 3
      initialDelaySeconds: 10
      periodSeconds: 5
      successThreshold: 1
      timeoutSeconds: 1
    startupProbe:
      exec:
        command: ["/bin/sh", "-c", "echo"]
      failureThreshold: 20 # = (initialDelaySeconds) / (periodSeconds) * (scale) = 20 / 5 * 10
      periodSeconds: 5
      successThreshold: 1
      timeoutSeconds: 1
The pod also has the vpaProbeUpdates annotation indicating that the startup probe is added.
The following Go code snippet describes the algorithm for setting up failureThreshold:
const (
    // startupProbeScale is the multiplier used when setting the parameter of a startup probe from a liveness probe.
    startupProbeScale = 10

    // maxStartupProbeDurationSeconds is the maxium time that the probe runs.
    maxStartupProbeDurationSeconds = 300
)

// If initialDelaySeconds is set, set the failure threshold
// based on that.  Otherwise set the failure threshold based
// on use the liveness probe's failure threshold.
var failureThreshold int32
if s := livenessProbe.InitialDelaySeconds; s > 0 {
    failureThreshold = s / periodSeconds * startupProbeScale
} else {
    failureThreshold = livenessProbe.FailureThreshold * startupProbeScale
}

// Do not allow startup probe to run more than maxStartupProbeDuration.
if m := maxStartupProbeDurationSeconds / periodSeconds; failureThreshold > m {
    failureThreshold = m
}
Automatically Cap Recommendations based on Node Capacity
The CloudNatix VPA has a mechanism to automatically cap the recommendations based on the capacities of the nodes in the cluster. To enable the feature, please set the following in the ccoperator-config configmap:
clusterAgent:
  maxAllowedUpdater:
    enable: true
When the feature is enabled, CloudNatix Cluster Controller periodically sets the maxAllowed of VPA resources based on node capacities. More specifically, maxAllowed for workload w is set to v where
v = max(f(n))over a set of nodes wherewcan be scheduled based on scheduling constraintsf(n) = (node allocatable) - sum(daemonset requests)
Automatically Create a PodDisruptionBudget for the Workload
PodDisruptionBudget (PDB) is a Kubernetes resource to limit the number of Pods of a replicated workload that are down simultaneously from voluntary disruptions.
CloudNatix has a built-in feature that automatically creates a PDB for the workload with "Autopilot" mode enabled. Additionally, CloudNatix provides the option to create a PDB for all workloads automatically. This feature is disabled by default. To enable it, please set the following values in the ccoperator-config ConfigMap.
clusterAgent:
  createPdbForAllWorkloads: true
CloudNatix creates PDBs based on RollingUpdate strategy of workloads. For example, if a deployment has maxUnavailable: 25% in its RollingUpdate strategy, the PDB created for the workload also has the same policy (= maxUnavailable: 25%).
If there are specific workloads for which you do not want to create a PDB, you can add the workload.cloudnatix.com/pdb-creation: no annotation to the workload. Here is a sample manifest:
apiVersion: apps/v1
kind: Deployment
metadata:
  name: my-nginx
  labels:
    app: nginx
  annotations:
    workload.cloudnatix.com/pdb-creation: no
spec:
  replicas: 1
  selector:
    matchLabels:
      app: nginx
  template:
    metadata:
      labels:
        app: nginx
    spec:
      containers:
        - name: nginx
          image: nginx:1.14.2
          ports:
            - containerPort: 80
Note: PDB resources are only created for workloads with two or more replicas; consider using Feature Dynamic Eviction to control workload interruption with a single replica.