

User Guide
Improving the Availability and Reliability of Autoscaled Kubernetes Clusters
Dynamic Eviction
Overview
Dynamic Eviction Controller is a feature that mitigates the impact of eviction on Deployments with only one replica. This controller keeps the number of Ready replicas above one during eviction.

This feature helps maintain SLO for applications running on Spot nodes. By temporarily adjusting the number of replicas during an eviction, the controller can safely evict them without allocating unnecessary resources for redundancy. Therefore, Spot can be used more efficiently without damaging the SLO of applications running on it.
Note: Supported Kubernetes version is v1.22 or later.
Enabling Dynamic Eviction Controller
The Dynamic Eviction feature is not enabled by default. To enable the feature, you need to take the following steps:
- Upgrade CCOperator to the latest version. Specify Dynamic Eviction related parameters in
values.yaml. - Add
cluster-rightscaler-agentto the list of Cluster Controller components that are installed in a cluster.
To upgrade CCOperator, you first need to pull the latest Helm chart (v0.534.0 or later).
helm repo add cloudnatix https://charts.cloudnatix.com
helm repo update
helm pull cloudnatix/ccoperator
Then set the Ccoperator version and Dynamic Eviction parameters for in values.yaml:
clusterRightscalerAgent:
  dynamicEvictionController:
    enable: true
Then the next step is to add cluster-rightscaler-agent to the list of Cluster Controller components. Here is an example command:
cnatix clusters components create \
  --cluster <cluster-name> \
  --kind cluster-rightscaler-agent \
  --version <agent-version> (--upgradable)
The latest stable version of cluster-rightscaler-agent can be found here. --upgradable is set when the component is auto-upgraded.
Enabling Dynamic Eviction of Deployment with annotation
Only pods with the opt-in annotation cloudnatix.com/enable-dynamic-eviction: "true" can delegate eviction requests to the cloudnatix controller.
Here is an example of Deployment manifest for Dynamic Eviction:
apiVersion: apps/v1
kind: Deployment
metadata:
  name: sample-app
  …
spec:
  …
  template:
    metadata:
      annotations:
        cloudnatix.com/enable-dynamic-eviction: "true"
     …
    spec:
      containers:
     …
Note: Please annotate only Deployments with 1 replica. Eviction will keep failing if the replica count is more than 1. Also, Non-Deployment resources such as Statefulset and DaemonSets are not supported.
Node Preflight Checker
Overview
Node Preflight Checker is a feature that prevents pods from being scheduled until the node has passed the preflight check. This feature is useful if you want to mark the node as not ready before the node has completed any custom initialization process.
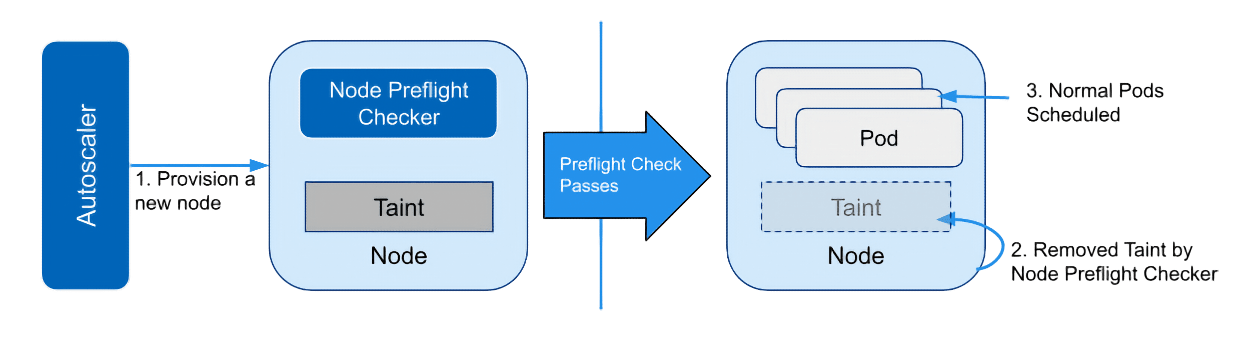
When an autoscaler creates a new node with the preflight startup taint, only the preflight checker and the system pods (e.g., kube-proxy) that have toleration, are assigned to the node. Once the preflight checker completes successfully, the preflight taint is removed from the node. After that, the node is ready to schedule normal pods.
Configure Autoscaler Startup Taint
Before you enable Node Preflight Checker, please set up startup taint on the Autoscaler. Node Preflight Checker requires that newly provisioned nodes have a node.cloudnatix.com/node-not-ready taint at startup.
The way to set a taint to a node depends on the autoscaler. In the case of Karpenter, please set .spec.startupTaints in the Provisioner resource as follow:
apiVersion: karpenter.sh/v1alpha5
kind: Provisioner
...
spec:
  startupTaints:
  - key: node.cloudnatix.com/node-not-ready
    value: "true"
    effect: NoExecute
Enabling Node Preflight Checker
The Node Preflight Checker is not enabled by default. To enable the feature, you need to take the following steps:
- Upgrade CCOperator to the latest version. Specify Node Preflight Checker related parameters in
values.yaml. - Add
cluster-rightscaler-agentto the list of Cluster Controller components that are installed in a cluster.
To upgrade CCOperator, you first need to pull the latest Helm chart (v0.599.0 or later).
helm repo add cloudnatix https://charts.cloudnatix.com
helm repo update
helm pull cloudnatix/ccoperator
Then set the Ccoperator version and Node Preflight Checker parameters for in values.yaml. There are two ways to specify the checker, see Preflight Checker Parameters for details:
clusterRightscalerAgent:
  nodePreflightChecker:
    enable: true
    checkerImage: <container-image>
    scriptConfigMap: <configmap-name> # (Optional)
Then the next step is to add cluster-rightscaler-agent to the list of Cluster Controller components. Here is an example command:
cnatix clusters components create \
  --cluster <cluster-name> \
  --kind cluster-rightscaler-agent \
  --version <agent-version> (--upgradable)
The latest stable version of cluster-rightscaler-agent can be found here. --upgradable is set when the component is auto-upgraded.
Preflight Checker Parameters
There are two ways to specify the preflight checker:
- Simply specify a container image that runs a preflight check script from the entrypoint.
- Specify a container image and a ConfigMap name that contains a preflight check script.
The first way is to specify a container image that contains a preflight checker script that works with a one-shot. If the exit code is 0, the check is marked as successful.
The second way is to specify both a container image and the ConfigMap name that contains the checker script, so you can change the script without rebuilding the image. The script name in the ConfigMap should be entrypoint.sh. Examples of CCOperator values.yaml and ConfigMap for the preflight checker are as follows:
clusterRightscalerAgent:
  nodePreflightChecker:
    enable: true
    checkerImage: ubuntu:23.04
    scriptConfigMap: node-preflightcheck-script
apiVersion: v1
kind: ConfigMap
metadata:
  name: node-preflightcheck-script
  namespace: cloudnatix
data:
  entrypoint.sh: |
    #!/usr/bin/env bash
    check driver installation
    ...
    echo ok